Triggers: Difference between revisions
Telcredstaff (talk | contribs) |
Telcredstaff (talk | contribs) |
||
| (25 intermediate revisions by the same user not shown) | |||
| Line 8: | Line 8: | ||
[[File:create-trigger-event.png|Create trigger for events]] |
[[File:create-trigger-event.png|border|Create trigger for events]] |
||
=== Reader input === |
=== Reader input === |
||
A trigger of type ''Reader input'' is activated when a user enters a pre-defined code on an access control reader. Codes are always prefixed with a * (e.g. *112) |
A trigger of type ''Reader input'' is activated when a user enters a pre-defined code on an access control reader. Codes are always prefixed with a * (e.g. *112). |
||
[[File:activate-trigger-reader.png|border|Activate trigger for readers]] |
|||
It is possible to require authentication to activate the trigger. If authentication is required, it is necessary to specify: |
|||
[[File:activate-trigger-reader.png|Activate trigger for readers]] |
|||
* The authentication method (card or personal PIN) |
|||
* Whether to block the card reader before presenting the authentication credential. This is to prevent the door from unlocking or even opening (especially if the door opens automatically). If 'Block access' is set to ''Yes'', the card reader will flash to indicate that the reader has been blocked and is ready to accept the credential. The correct procedure for the end user then becomes: |
|||
# Enter activation code |
|||
# Wait for the reader to flash (to indicate that the reader has been blocked) |
|||
# Present the credential (swipe card or enter PIN) |
|||
* Allowed [[Roles|roles]], i.e. which roles should be allowed to activate the trigger. |
|||
==== User feedback ==== |
|||
All readers behave a little differently, but in general this is what should be expected. |
|||
=== Remote action === |
|||
A trigger of type ''Remote action'' is activated from the mobile app [[Telcred Personal]]. It is necessary to specify whether the origin is by ''Overview'' or by ''Door''. This determines if the trigger will be displayed in the top menu of the app or on the respective page of the individual doors. It can also have consequences for what the trigger does, in case the trigger invokes a command (see further the section on origin independent commands vs. origin dependent commands in the [[Commands|commands]] documentation). Just as for ''Reader input'' with authentication, it is necessary to specify which [[Roles|roles]] are allowed to activate the trigger. |
|||
[[File:activate-trigger-remote.png|Activate remote trigger]] |
|||
=== IO port activity === |
|||
Finally, a trigger of type ''IO port activity'' is activated when an input port on a controller changes state. It is necessary to specify which input port and transition should activate the trigger. |
|||
[[File:activate-trigger-ioport.png|Activate IO port trigger]] |
|||
== Optional restrictions == |
|||
It is possible to restrict a trigger with regards to: |
|||
* When the trigger can be activated |
|||
* Which events or actions can activate the trigger |
|||
The options for restricting the trigger depend on the trigger type and possibly also on choices made regarding the trigger activation. For example, for a trigger of type ''Event'', the available restrictions will depend on which event(s) activate the trigger. An ''Access granted'' event can be restricted with regards to time door, user, and method: |
|||
[[File:trigger-restrictions-event-access-granted.png|Restrictions for Access granted event]] |
|||
On the other hand, a ''Controller offline'' event can only be restricted with regards to time and controller: |
|||
[[File:trigger-restrictions-event-controller offline.png|Restrictions for Controller offline event]] |
|||
Depending on the events selected, the optional restrictions will change. For example, events related to controllers (as in the example above) will result in optional restrictions for controllers, while events related to doors (e.g. ''Access granted'') will result in optional restrictions related to doors. |
|||
[[File:trigger-restrictions-controller.png|Restrictions for controller events]] |
|||
=== Reader input === |
|||
=== Remote action === |
|||
=== IO port activity === |
|||
==== Trigger types ==== |
|||
Triggers are a way to start one or more commands. There are several trigger types: |
|||
* ''Reader anonymously''. The trigger is activated by entering a special code on an access control reader. No authentication required. |
|||
* ''Reader - PIN authentication''. The trigger is activated by entering a special code on an access control reader, followed by a personal PIN. |
|||
* ''Reader - card authentication''. The trigger is activated by entering a special code on an access control reader, followed by a card credential. |
|||
* ''Access granted''. The trigger is activated when access is granted through a reader, the [[Telcred Entry]] app, a ''[[Visits|visit]]'' URL, or REX (but not by an administrator or through the API). |
|||
* ''Door forced open''. The trigger is activated when a ''Door forced open'' event occurs. |
|||
* ''Remote by overview''. The trigger is available from the [[Telcred Entry]] app, without first selecting a specific door. |
|||
* ''Remote by door''. The trigger is available from the [[Telcred Entry]] app, after selecting a specific door. The door from which the trigger was activated will be considered in the command. |
|||
* ''IO port activity''. The trigger is activated when an input port on a door controller changes state. |
|||
==== Setting up a reader (door) trigger ==== |
|||
Reader triggers are activated by entering a special code on an access control reader. First, it is necessary to define which command(s) the trigger should start. A reader trigger can start any type of command(s), including both door actions and user defined commands. |
|||
[[File:door-trigger.png|Door trigger]] |
|||
Native door actions are applied to the door of the reader where the trigger is activated and output port commands are applied to the controller of the reader where the trigger is activated. If it is desired to manipulate other doors or other controllers, it is necessary to first create commands with target ''Doors'' and/or ''Controllers''. |
|||
The next step is to define how to activate the trigger. Reader trigger activation codes always start with a * followed by one or more digits. It is recommended to use the same number of digits as for normal user PIN codes minus one, so that the total length of the activation code including the * matches the max PIN length. |
|||
Reader trigger activation codes need to be unique over the doors in their scope. This means that two different triggers can have the same activation code, as long as the doors they are restricted to (see below) do not overlap. An example of where this can be useful is if a trigger is used to lock down the building where the trigger is used. In this example, users only have to remember one code, but only the doors of the building where the activation code is entered will be affected. |
|||
[[file:trigger-activation.png|Trigger activation]] |
|||
For reader trigger types that require an authentication credential (PIN or card) it is necessary to specify which role(s) that should have access to the trigger. Note that in this context, the PIN is the user's PIN, which has nothing to do with the trigger activation code. |
|||
Finally, it is possible to define restrictions on the trigger: |
|||
* When it can be entered (schedule) |
|||
* From which doors it can be entered (doors and/or door groups) |
|||
[[file:trigger-restrictions.png|Trigger restrictions]] |
|||
==== Activating a reader trigger ==== |
|||
All readers behave a bit differently, however the general process will look like this: |
|||
===== No authentication credential required ===== |
===== No authentication credential required ===== |
||
# Enter the activation code (e.g. *111). |
# Enter the activation code (e.g. *111). |
||
# Wait for a blinking "success indicator" (will blink for approx. two seconds). The success indicator indicates that the command completed successfully |
# Wait for a blinking "success indicator" (will blink for approx. two seconds). The success indicator indicates that the command completed successfully. If the success indicator is not displayed, the command failed to complete all of its actions. |
||
===== Authentication credential required ===== |
===== Authentication credential required ===== |
||
| Line 117: | Line 37: | ||
# Enter the activation code (e.g. *111). |
# Enter the activation code (e.g. *111). |
||
# Wait for the reader to start blinking (can take a few seconds). This means that the reader has been temporarily blocked and is ready to receive the authentication credential (i.e. user PIN or card) without granting access. |
# Wait for the reader to start blinking (can take a few seconds). This means that the reader has been temporarily blocked and is ready to receive the authentication credential (i.e. user PIN or card) without granting access. |
||
# Wait for a blinking "success indicator" (will blink for approx two seconds). The success indicator indicates that the command completed successfully |
# Wait for a blinking "success indicator" (will blink for approx two seconds). The success indicator indicates that the command completed successfully. If the success indicator is not displayed, the command failed to complete all of its actions. |
||
=== Mobile action === |
|||
==== Setting up an access granted trigger ==== |
|||
A trigger of type ''Mobile action'' is activated from the mobile app [[Telcred Personal]]. It is necessary to specify whether the origin is by ''Site'' or by ''Door''. This determines if the trigger will be displayed on the Site detail page or on the respective page of the individual doors. It can also have consequences for what the trigger does, in case the trigger invokes a command (see further the section on independent commands vs. origin dependent commands in the [[Commands|commands]] documentation). Just as for ''Reader input'' with authentication, it is necessary to specify which [[Roles|roles]] are allowed to activate the trigger. |
|||
For an access granted trigger it is not necessary to specify any activation. The trigger will activate on all user initiated access granted events (but not on access granted events initiated from the Telcred API). |
|||
[[ |
[[File:activate-trigger-remote.png|border|Activate remote trigger]] |
||
=== IO port activity === |
|||
A trigger of type ''IO port activity'' is activated when an input port on a controller changes state. It is necessary to specify which input port and transition should activate the trigger. |
|||
It is possible to define restrictions on the trigger: |
|||
* When it can be activated (schedule) |
|||
* From which doors it can be activated (doors and/or door groups) |
|||
[[File:activate-trigger-ioport.png|Activate IO port trigger]] |
|||
==== Setting up a door forced open trigger ==== |
|||
=== External request === |
|||
For a door forced open trigger it is not necessary to specify any activation. The trigger will activate when a door forced open event occurs. |
|||
A trigger of type ''External request'' is activated when the Telcred Access Manager service receives an https GET or POST request on a specified "secret" URL, which is automatically generated by the Telcred service. |
|||
It is possible to define restrictions on the trigger: |
|||
* When it can be activated (schedule) |
|||
* From which doors it can be activated (doors and/or door groups) |
|||
[[File:activate-trigger-external-request.png|Activate External request trigger]] |
|||
==== Setting up a remote trigger ==== |
|||
== Optional restrictions == |
|||
Remote triggers are activated from the [[Telcred Entry]] app. There are two types of remote triggers: |
|||
It is possible to restrict a trigger with regards to: |
|||
* Remote by overview |
|||
* When the trigger can be activated |
|||
* Remote by door |
|||
* Which events or actions can activate the trigger |
|||
The options for restricting the trigger depend on the trigger type and possibly also on choices made regarding the trigger activation. For example, for a trigger of type ''Event'', the available restrictions will depend on which event(s) activate the trigger. An ''Access granted'' event can be restricted with regards to time door, user, and method: |
|||
Remote by overview triggers do not include information about any specific door when they are activated by the user. Therefore, they can only be used with commands defined by the administrator (as opposed to "native" door commands, e.g. ''override to unlock''). In other words, remote by overview should be used for commands that do not target a specific door. |
|||
[[File:trigger-restrictions-event-access-granted.png|Restrictions for Access granted event]] |
|||
[[file:remote-by-overview.png|Remote by overview]] |
|||
On the other hand, a ''Controller offline'' event can only be restricted with regards to time and controller: |
|||
[[File:trigger-restrictions-event-controller offline.png|Restrictions for Controller offline event]] |
|||
Remote by door commands are available from the door page in the [[Telcred Entry]] app, and include information about the door when they are activated by the user. Therefore, they are suitable for triggering commands that target individual doors, e.g. override to unlock, override to locked, etc. |
|||
Restrictions that do not apply to all of the activation conditions will not be displayed. For example, if both ''Access granted'' and ''Controller offline'' are selected as activation conditions for a trigger of type ''Event'', it will only be possible to restrict the trigger with regards to time since no event contains attributes for both door and controller. In this case, it may be necessary to create two separate triggers - each with its own restrictions. |
|||
[[file:remote-by-door.png|Remote by door]] |
|||
[[File:trigger-restrictions-access-mixed.png|Restrictions for mixed door and controller events]] |
|||
It is possible to define a ''remote by door'' trigger that invokes a command that does not target any specific door. However, that has the potential to confuse the end user, so it is not recommended to do so. The reason administrator defined commands are available also for ''remote by door'' triggers is that a trigger can invoke several commands of which one could be door specific and others not (e.g. unlock the door and turn on the light). |
|||
== Notifications and commands == |
|||
==== Setting up an IO port trigger ==== |
|||
The final step of creating a trigger is to specify what should happen when the trigger is activated. The same trigger can invoke both notifications and [[Commands|commands]]. For notifications, it is necessary to specify the [[Recipients|recipient(s)]]. |
|||
For an IO port trigger it is necessary to specify the input port and transition that should activate the trigger. |
|||
[[file:recipients.png|border|Recipients]] |
|||
[[file:controller-trigger-activation.png|Controller trigger activation]] |
|||
Commands are divided into ''Origin independent'' and ''Origin dependent''. The two categories are explained in more detail in the documentation for [[Commands|commands]], but in short an origin independent command will always have the same effect, regardless from where it is triggered, while an origin dependent command takes the origin as an input (e.g. perform ''Override to unlocked'' on the door where the trigger is entered on the reader or activate an output port on the controller of the door where the trigger is entered). |
|||
Just as for commands targeting the output port(s) not all controllers have the same number of IO ports, so it is necessary to know which type of controller that will be used when specifying the input port for the trigger. It is also necessary to [[A1001_settings#IO_port_settings|configure the IO ports of the controller]]. |
|||
As for other trigger types, it is possible to define restrictions on the trigger: |
|||
[[file:commands.png|border|Commands]] |
|||
* When it can be entered (schedule) |
|||
* From which doors it can be entered (doors and/or door groups) |
|||
Latest revision as of 15:23, 17 February 2026
Using triggers, it is possible to specify conditions that, when met, should send a notification, start a command, or both.
Trigger types and activation
Event
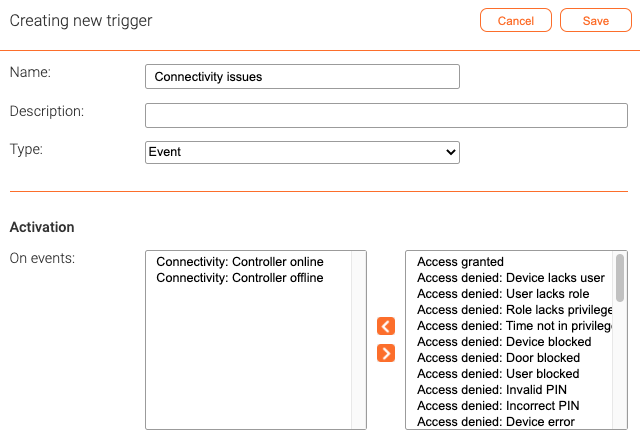
A trigger of type Event is activated when a matching event is received in the event log.
Reader input
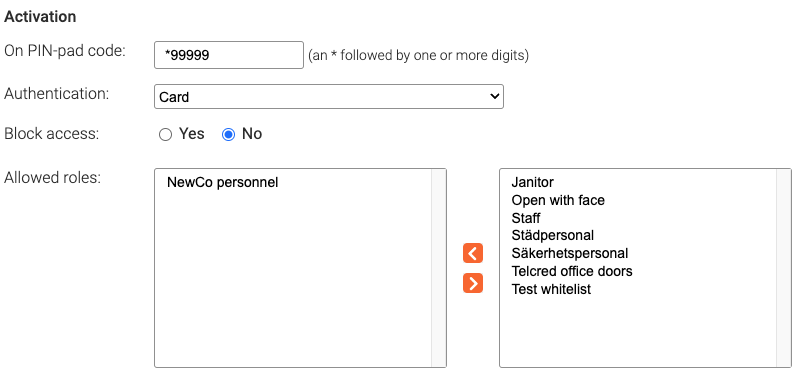
A trigger of type Reader input is activated when a user enters a pre-defined code on an access control reader. Codes are always prefixed with a * (e.g. *112).
It is possible to require authentication to activate the trigger. If authentication is required, it is necessary to specify:
- The authentication method (card or personal PIN)
- Whether to block the card reader before presenting the authentication credential. This is to prevent the door from unlocking or even opening (especially if the door opens automatically). If 'Block access' is set to Yes, the card reader will flash to indicate that the reader has been blocked and is ready to accept the credential. The correct procedure for the end user then becomes:
- Enter activation code
- Wait for the reader to flash (to indicate that the reader has been blocked)
- Present the credential (swipe card or enter PIN)
- Allowed roles, i.e. which roles should be allowed to activate the trigger.
User feedback
All readers behave a little differently, but in general this is what should be expected.
No authentication credential required
- Enter the activation code (e.g. *111).
- Wait for a blinking "success indicator" (will blink for approx. two seconds). The success indicator indicates that the command completed successfully. If the success indicator is not displayed, the command failed to complete all of its actions.
Authentication credential required
- Enter the activation code (e.g. *111).
- Wait for the reader to start blinking (can take a few seconds). This means that the reader has been temporarily blocked and is ready to receive the authentication credential (i.e. user PIN or card) without granting access.
- Wait for a blinking "success indicator" (will blink for approx two seconds). The success indicator indicates that the command completed successfully. If the success indicator is not displayed, the command failed to complete all of its actions.
Mobile action
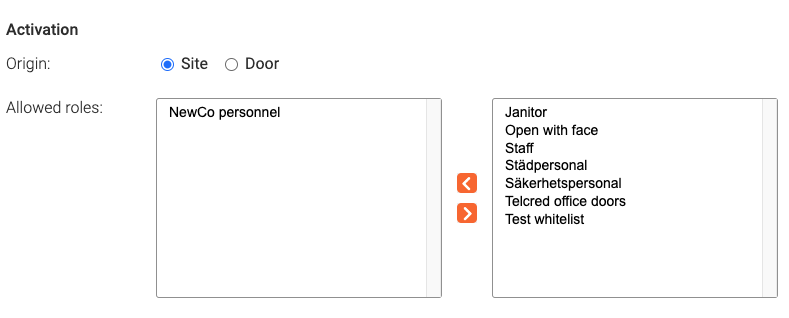
A trigger of type Mobile action is activated from the mobile app Telcred Personal. It is necessary to specify whether the origin is by Site or by Door. This determines if the trigger will be displayed on the Site detail page or on the respective page of the individual doors. It can also have consequences for what the trigger does, in case the trigger invokes a command (see further the section on independent commands vs. origin dependent commands in the commands documentation). Just as for Reader input with authentication, it is necessary to specify which roles are allowed to activate the trigger.
IO port activity
A trigger of type IO port activity is activated when an input port on a controller changes state. It is necessary to specify which input port and transition should activate the trigger.
External request
A trigger of type External request is activated when the Telcred Access Manager service receives an https GET or POST request on a specified "secret" URL, which is automatically generated by the Telcred service.
Optional restrictions
It is possible to restrict a trigger with regards to:
- When the trigger can be activated
- Which events or actions can activate the trigger
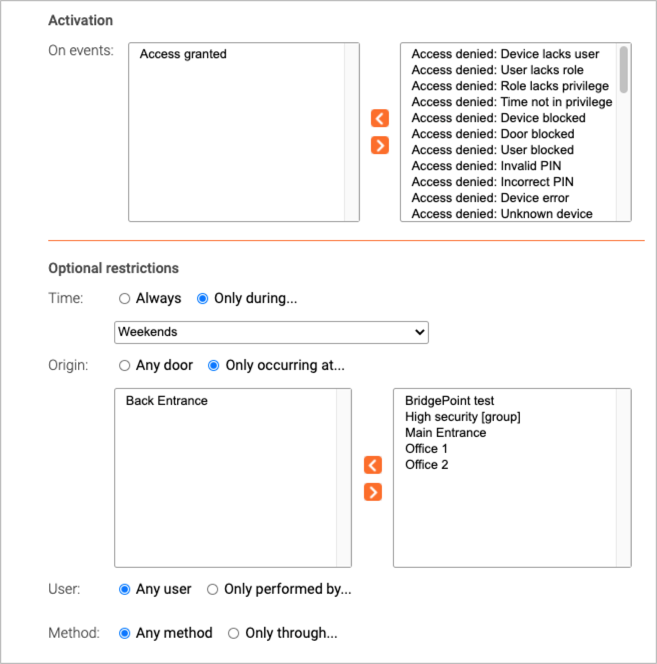
The options for restricting the trigger depend on the trigger type and possibly also on choices made regarding the trigger activation. For example, for a trigger of type Event, the available restrictions will depend on which event(s) activate the trigger. An Access granted event can be restricted with regards to time door, user, and method:
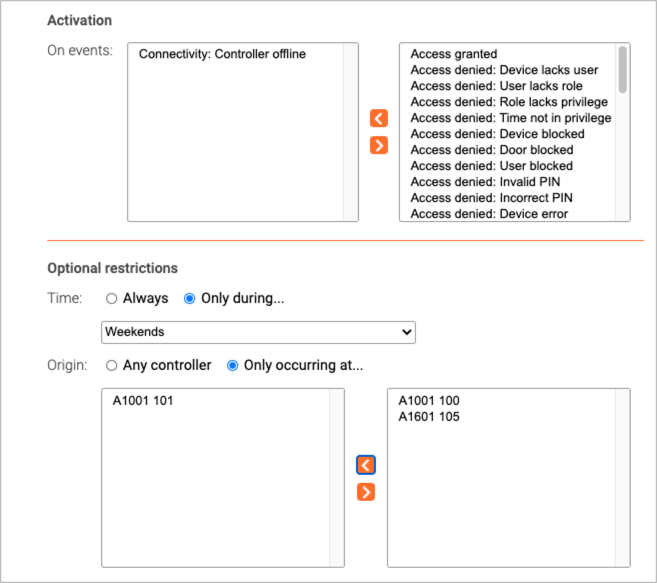
On the other hand, a Controller offline event can only be restricted with regards to time and controller:
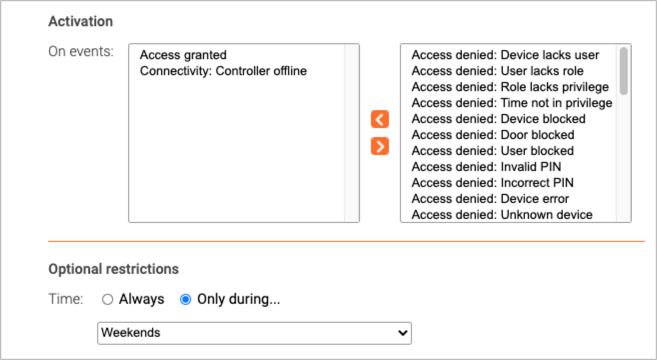
Restrictions that do not apply to all of the activation conditions will not be displayed. For example, if both Access granted and Controller offline are selected as activation conditions for a trigger of type Event, it will only be possible to restrict the trigger with regards to time since no event contains attributes for both door and controller. In this case, it may be necessary to create two separate triggers - each with its own restrictions.
Notifications and commands
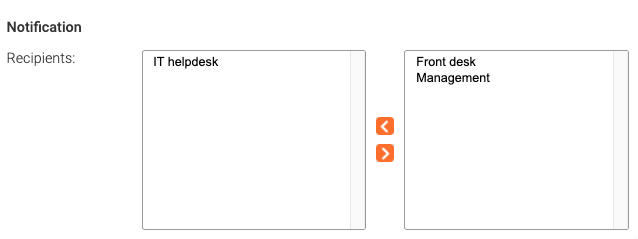
The final step of creating a trigger is to specify what should happen when the trigger is activated. The same trigger can invoke both notifications and commands. For notifications, it is necessary to specify the recipient(s).
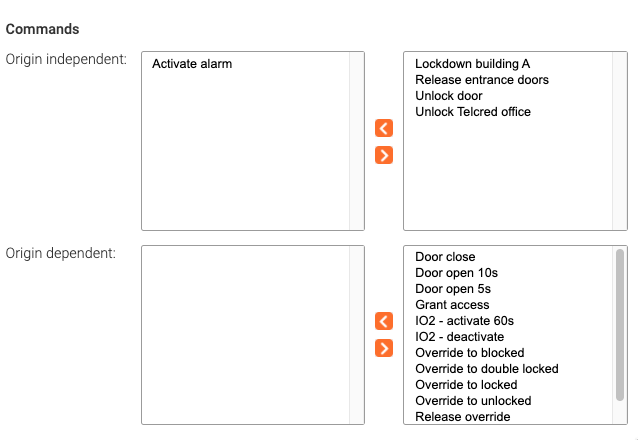
Commands are divided into Origin independent and Origin dependent. The two categories are explained in more detail in the documentation for commands, but in short an origin independent command will always have the same effect, regardless from where it is triggered, while an origin dependent command takes the origin as an input (e.g. perform Override to unlocked on the door where the trigger is entered on the reader or activate an output port on the controller of the door where the trigger is entered).
