Cards: Difference between revisions
No edit summary |
|||
| Line 1: | Line 1: | ||
Cards refers to both actual cards and keyfobs. |
|||
Telcred currently supports two main types of devices or credentials: cards and mobile phones. |
|||
== |
== Adding a card == |
||
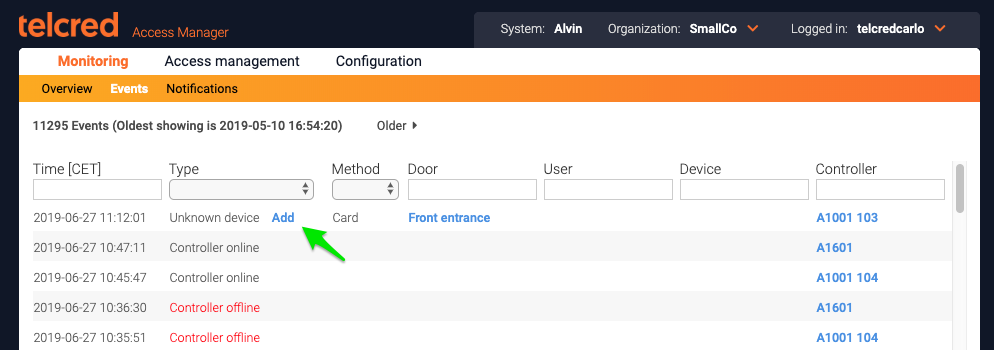
A common way to add a new card to the system is to first touch it to a connected reader. Then select ''Events'' in the Monitoring section of the menu. An unknown device should appear at the top of the list with a link to add it (it can take a few seconds before the event shows up). |
A common way to add a new card to the system is to first touch it to a connected reader. Then select ''Events'' in the Monitoring section of the menu. An unknown device should appear at the top of the list with a link to add it (it can take a few seconds before the event shows up). |
||
| Line 29: | Line 29: | ||
A card can only belong to one user at the time, but it is possible to reassign it from one user to another. |
A card can only belong to one user at the time, but it is possible to reassign it from one user to another. |
||
== Mobile phones == |
|||
To register a mobile phone, add a new ''Device'' and select type ''Mobile phone''. |
|||
[[File:create_phone.png|border|Create phone]] |
|||
Just like for cards, it is possible assign the phone to a user, specify the time period during which the phone should be active, and to block it temporarily if it has been lost. |
|||
After saving, a ''Registration code'' is presented which is needed when starting the [[Telcred Personal]] app for the first time. This associates the app that the user downloaded and installed with its corresponding identity in Telcred Access Manager. After the user has entered this code in the app, its ''Registered'' status will change to ''yes''. |
|||
[[File:registration-code.png|border|Registration code]] |
|||
Revision as of 19:49, 14 December 2022
Cards refers to both actual cards and keyfobs.
Adding a card
A common way to add a new card to the system is to first touch it to a connected reader. Then select Events in the Monitoring section of the menu. An unknown device should appear at the top of the list with a link to add it (it can take a few seconds before the event shows up).
Click the link to add the information for the new card:
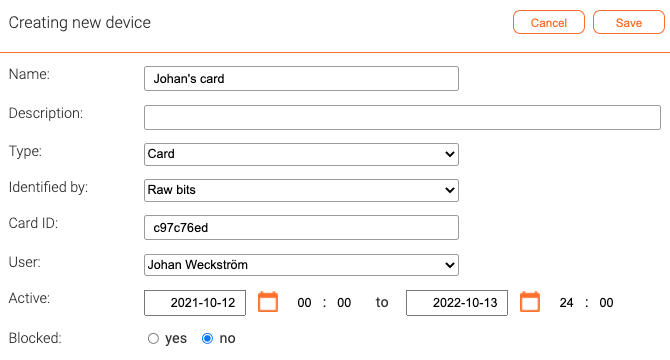
When adding a new card it is required to give it a name. It is also possible to enter an optional description.
The field Identified by has two possible values: Raw bits and Number. Raw bits is the default and means that the card is identified by all the bits that the reader receives from the card. If raw bits is chosen, the Card ID needs to be entered with hexadecimal notation (this is done automatically if the card registration process above is followed).
If, instead, the card should be identified by Number, the Card ID should be entered as a decimal number (e.g. 12408).
In general, it is always better to use Raw bits and the only reason to use Number is for backwards compatibility with a previous access control system (for example, if the customer already has a large number of cards for which only the decimal number is known, and it is not practical to collect and re-register the cards).
The card can be assigned to a user in this screen or it can be done in the User screen. It is possible to specify the time period during which the card should be active. A card which does not belong to a user or is no longer active is not able to open any doors.
A card can be temporarily blocked, e.g. if it is lost. If found again, the card can simply be unblocked.
A card can only belong to one user at the time, but it is possible to reassign it from one user to another.
At the bottom of the page, there is a link that lets you check the access rights for the user.

